Headless
Overview
The purpose of this article will be to provide the reader with a general, high-level overview of the Headless implementation as well as offer detailed installation instructions and details to infrastructure changes when compared to a normal App Manager installation.
What is Headless?
A “headless” development approach allows developers to use the presentation framework in Akumina’s Employee Experience Platform and develop outside of Microsoft SharePoint’s runtime for faster innovation and customization. What do we mean by headless? Headless (or decoupled) development means separating where content is stored and edited from where it is delivered. Akumina’s front-end technology is able to run within and outside of SharePoint. By delivering digital employee experiences in Microsoft Azure, enterprises have more control over the back-end architecture and scaling, leading to better performance and security. And Akumina’s EXP delivers a flexible, unrestricted path to faster development and integration.
What are the benefits of Headless?
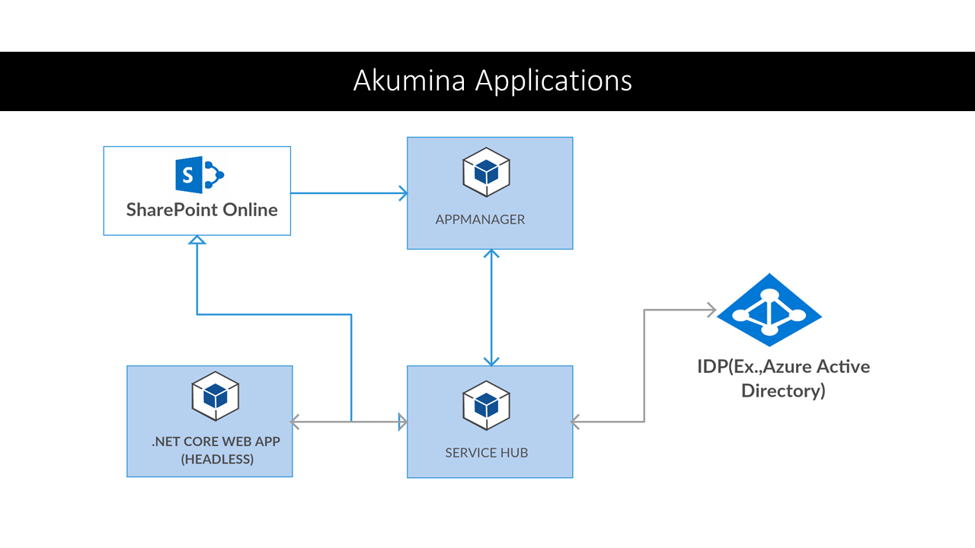
Get all the best of SharePoint and Office 365 without any restriction on the front end in Akumina’s framework. Headless design principles can drastically improve your site visitor experience. Headless can be easier to scale, perform better and faster, easier to develop and test, and is fully compatible with Akumina’s AppManager and Service Hub. Akumina’s front-end frameworks and widgets are delivered through a headless ASP.Net-based runtime. Content and information is delivered through the Akumina Service Hub, which provides the necessary caching, API connectivity and the abstraction to drive the end-user experience. Akumina’s architecture allows for all pre-built widgets to be reused in Akumina’s headless offering.
SharePoint (modern or classic) becomes a data container instead of a user interface.
Any identity provider (such as AAD, Okta, Ping) that SharePoint supports will work with headless.
Akumina headless development supports infrastructure as a service (IaaS) and platform as a service (PaaS) containers.
You can use the same development platform for SharePoint or headless. You can apply your widgets to any canvas, making it up to 100 times faster.
A headless site can easily be converted to a mobile app.
Prerequisites
System Requirements
Install IIS ASP.NET Core Module: https://docs.microsoft.com/en-us/aspnet/core/host-and-deploy/aspnet-core-module?view=aspnetcore-5.0
Infrastructure Requirements
An Akumina site must be already setup in SharePoint, using Azure Active Directory. For best results with a quickstart, a foundation site should be used.
For more information please see Installation Guides: https://community.akumina.com/kbtopic/installation-guides/
Setting up a local Headless website
{headlessappdir} refers to the root folder of the Headless website on your web server
Website Creation
- Create a directory for your Headless website in your IIS root directory (usually C:\inetpub). This directory will now be referred to as {headlessappdir}
- Create a new website in IIS and point to {headlessappdir}
- Bind your SSL certificate to your new Headless website
Deployment
- Extract drop-headlesscore files into {headlessappdir}
- Extract drop-headlesscore-wwwroot into {headlessappdir}/wwwroot
Configuration
Three steps are required to configure the Headless website:
- Edit {headlessappdir}/wwwroot/Akumina Library/DigitalWorkplace/JS/digitalworkplace.env.js
- Edit {headlessappdir}/appsettings.json
- Set permissions on {headlessappdir}/logs folder
Edit {headlessappdir}/wwwroot/Akumina Library/DigitalWorkplace/JS/digitalworkplace.env.js
Set Akumina.Digispace.ConfigurationContext.InterchangeURL to App Manager URL
Set Akumina.Digispace.ConfigurationContext.InterchangeQueryKey to query key
Set Akumina.Digispace.ConfigurationContext.ConfigurationSiteUrl to SiteCollectionUrl
Set Akumina.Digispace.ConfigurationContext.TemplateURLPrefix to headless URL
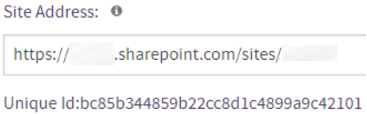
Set Akumina.Digispace.SiteContext.UniqueId to Unique Id
To obtain the Unique Id, go to the App Manager Global Settings for the site (/Admin/Settings) and locate the value
Edit {headlessappdir}/appsettings.json
Set the following properties:
- AkQueryAs
- AkAuthMode
- AkDataHubUri
- AkTenantId
- AkSpUrl
- AkQueryKey
- akumina:RedisCachePartitionKey
- AkModernSite
Set permissions on {headlessappdir}/logs
Grant Modify permissions to IIS_IUSRS group (or IIS user) for logs folder at {headlessappdir}/logs
Configure CORS
Configure the App Manager CORS settings to allow requests from the Headless website.
Setting up a production Headless website
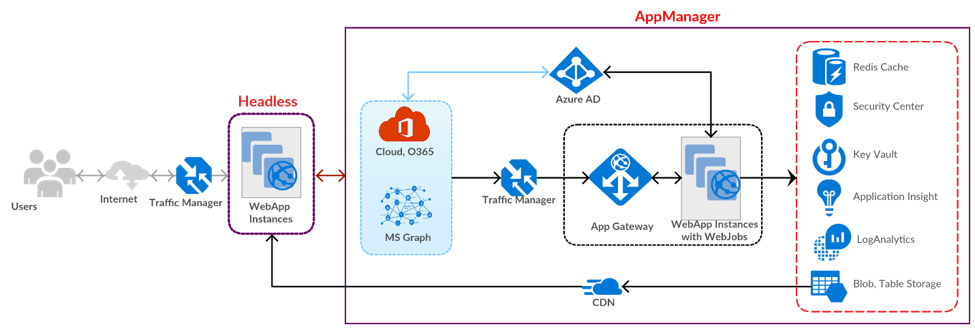
Headless can be hosted in virtual machines (IaaS), web applications (PaaS), or containers.
Hosting in VM (IaaS)
- Create a Windows VM 2019
- Install Web Server (IIS) with HTTP Activation
- Install .NET Core hosting bundle https://docs.microsoft.com/en-us/aspnet/core/host-and-deploy/iis/?view=aspnetcore-3.#install-the-net-core-hosting-bundle
- Create website
Hosting in Azure Web App (PaaS)
- Create WebApp using .NET core
- Deploy from Visual Studio or FTP all the published files
Hosting in Container
- Install Docker for Windows
- Create a Docker container image
- Upload container image to Azure Container Registry
- Deploy a web app using the ACR image
Things to know
- Enable HTTPS only, and enable TLS 1.2 for web app over port 443
- If you host in Microsoft Azure, they will open additional ports such as 454, 455, 21, 10001-10020, 4016,4018, and 4020. Please note these ports are not required for Akumina Application. If you need to block any of these ports please refer this Microsoft documentation from https://azure.microsoft.com/en-us/documentation/articles/app-service-app-service-environment-control-inbound-traffic/ (in case App Service Environment you can actually block some of them at the VNET level)
- Always update to latest .NET core
Using a custom View (.cshtml)
Headless has the ability to handle custom Views for serving static pages.
To configure routing for your custom View:
- Copy your .cshtml to a folder in {headlessappdir}/Views
a. You can create a new folder under {headlessappdir}/Views if you wish - Add an entry for your View to {headlessappdir}/routconfig.json a. Format is "/customRoute": "~/Views/Path/To/Your/view.cshtml"