NPM Commands
Overview
The purpose of this article will be to elaborate on the NPM Commands offered by the Akumina Project structure. The NPM commands, their usages, syntax, and nuances, will be covered in-depth as well as some sneak peeks at what will be coming in the future. All commands listed below, aside from future sneak peeks, are offered by default as part of the Akumina Yeoman Generator.
Common Strategies
Scenario: I have an Akumina Project Structure with many widgets. I am currently developing/testing only one widget and would like to deploy only that widget.
Solution: This is a fairly common scenario with a very simple fix. If, for example, your project contains 50 widgets and you would only like to package and deploy a single widget, the following commands will produce the desired results.
npm run clean // Remove unnecessary files
npm run build // Build all widgets  (See below)
npm run package widgetName // Build the single widget
npm run deploy // Deploy your single packaged widget
- Note: As of writing, the current implementation for building Akumina Widgets scans your project directory to build all widgets found. If you are running an older version of the Akumina Project Structure, you may notice something similar in your webpack.config.js:
function genWidgets() {
    return [
        genWidgetConfig('./src/js/library/widgets/ClientNamespace.Widgets.widgetone.js', 'ClientNamespace.Widgets.widgetone.min.js', env),
        genWidgetConfig('./src/js/library/widgets/ClientNamespace.Widgets.widgettwo.js', 'ClientNamespace.Widgets.widgettwo.min.js', env),
    ]
}
This is an older implementation of the build process in which evey widget in the project is individually defined. To build a single widget, one can manipulate this older process by simply commenting out the widgets which should not be built. Note: This is an older version of the process and is not advised, nor supported, by current versions.
Clean
npm run clean
The Clean command is also very straight-forward. The clean command will remove packaged and bundled widget items. The Clean Command is provided as a function of the Akumina Widget Builder. The following items are removed as part of the clean command:
- All widget folders under root\dist\
- All zip files under root\build\SiteDefinitions\ClientNamespace\widgetpackages\
There are no optional parameters for this command.
Build
npm run build
The Build command is fairly straight-forward. The command calls webpack to build the widgets, bundles, and minified files in your project structure using the settings defined in you webpack.config.js file. The file is, by default, set up to bundle your widget packages using the Namespace defined as part of the Akumina Yeoman Generator process.
Example:
var jsClientName = "Akumina";

var genWidgetsConfig = function (widgetName) {
    var ext = '.tsx';
    var extOut = '.js';
    var o = {
        filename: widgetName + extOut,
        path: path.resolve(__dirname, 'dist/widgets'),
        library: [jsClientName, 'AddIn', widgetName],
        libraryTarget: 'var',
    };
    o.libraryExport = widgetName;

    return {
        name: "core",
        // target: "node",
        entry: widgetSrcDir + '/' + widgetName + '/js/widgets/' + widgetName + ext,
        output: o,
        externals: {
            "akumina-core": "Akumina",
            "jquery": "jQuery",
            "Akumina": "Akumina",
            'react': 'React',
            'react-dom': 'ReactDOM'
        },
        resolve: {
            extensions: ['.ts', '.js', '.tsx'],
        },
        plugins: [
            new webpack.ProvidePlugin({
                $: "jquery",
                jQuery: "jquery",
                Akumina: "Akumina",
                'react': 'React',
                'react-dom': 'ReactDOM'
            }),
        ],
        module: {
            rules: [
                {
                    test: /\.(ts|tsx)$/,
                    loader: 'ts-loader'
                },
                {
                    test: /\.css$/,
                    loader: ['style-loader', 'css-loader']
                }
            ]
        }
    };

};
Following the above example, each widget will be built under the "Akumina.AddIn" namespace. The webpack config also bundles dependencies of your widgets in the project. The above webpack.config.js snippet is taken from a project set up for Akumina Framework V4.5 and using ReactJS and Typescript.
There are no optional parameters for this command.
Package
npm run package <widget> <--skipInstances=true/false>
The Package command bundles each individual widget, and its dependent remote files, into zip files for use in deployment or manual import to Sharepoint sites using the Akumina Framework.
Consider the following widget structure and zip structure:
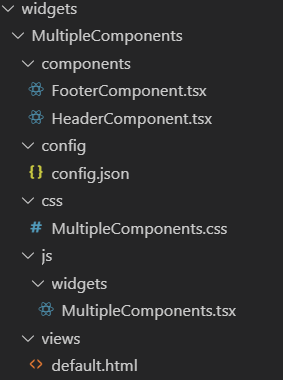
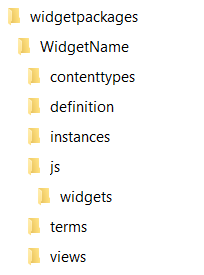
The zip file will contain the following files:
- Widget Javascript (zip/js/widgets)
- Widget Views (zip/views)
- .json file defining views, their locations, and their aliases (zip/views)
- Widget Definition (zip/definition)
- Widget Instance Definitions (zip/instances)
- Content Types (zip/contenttypes)
- Terms (zip/terms)
Optional Params
- widget
The optional widget param defines an individual widget to package. If a project structure were to contain a large amount of widgets, or large widgets, packaging each individual widget is a time consuming process when only one needs to be packaged. In anticipation of these needs, the Akumina Widget Builder was designed to take this optional parameter to package an individual widget.
For example, the following command will only package the MyFirstWidget widget:
npm run package MyFirstWidget
Please note that name provided must match the name of the folder containing the widget and not the name defined in the config.json contained within the project structure.
- --skipInstances
The skipInstances flag is assigned a boolean value and tells the package functionality to bundle the widget but not to bundle the instances with the zip. This is useful in the event that you would like to deploy the widget as a bare definition without deploying the instances associated with it.
For more information, please see the Skipping Widget Instances page.
Deploy
npm run deploy
The Deploy Command will deploy the chosen assets to the defined site collection.
The options chosen in the akumina.sitedeployer.config.json file will determine what assets are deployed. These options are explained in-depth on the Site Deployer V4.1 and Site Deploer V4.5 pages. The site collection url and authentication parameters are set in the .env file in the project root directory.
There are no optional parameters for this command.
Stub
npm run stub <name>
The Stub Command starts the main function of the Akumina Widget Builder module. This function is a scaffolding process to create a new widget in the current project structure. This feature is covered more in-depth on the Akumina Widget Builder page.
Optional Params
The name parameter is an optional parameter that will create a new widget with the specified name using default settings. This is a courtesy function to create a new widget with little to no interaction as fast as possible.
Config
npm run config
The Config command is a failsafe in case the akumina.config.json file is deleted, moved, or becomes corrupted. If the file is present, the command will read from the file and output the contents to the terminal. If the file does not exist, the function will write a new file with default settings. Below is an example of the default akumina.config.json generated by the process:
{
    "WidgetsSourcePath": "src/js/widgets",
    "WidgetPackageDestinationPath": "dist",
    "WidgetPackageVersion": "0.0.0.0",
    "WidgetPackageDistPath": "dist/packages/",
    "CDNAssetsPath": "dist/CDNAssets",
    "Environments": [
        {
            "Name": "dev",
            "AppManagerUrl": "https://[appmanagerurl]",
            "AppManagerQueryKey": "[appmanagerquerykey]",
            "SharepointUrl": "https://[tenant].sharepoint.com/sites/dev"
        }
    ]
}
There are no optional parameters for this command.
All
npm run all
The All Command will run the following commands sequentially:
npm run clean
npm run build
npm run package
npm run deploy
There are no optional parameters for this command.
VPStub
npm run vpstub <name>
The VPStub Command will run the Virtual Page Creator process. The process is designed to allow the developer to programmatically create a Virtual Page JSON file by stepping through the process of creating the page, and its layout, including widgets, from top to bottom. The process is explained more in-depth on its specific page.
Optional Params
The Name parameter will create an empty virtual page file with the specified name using default options.
Example:
{
    "Name": "test",
    "Id": "987a6c0c-f53c-4526-9f27-0066565e3b1c",
    "Type": "GenericPage",
    "List": "GenericPages_AK",
    "AdditionalSelectColumns": "",
    "Url": "/Pages/test.aspx",
    "Personas": [],
    "PageDefinition": {
        "Containers": [
            {
                "id": "",
                "layoutid": "",
                "zones": [
                    {
                        "id": "",
                        "widgets": []
                    }
                ]
            }
        ]
    },
    "IsLegacyMode": false
}