Building a New Widget Instance
OBJECTIVES
In this exercise, you will –
- Create a new widget instance from a stub
- Modify the properties of the widget instance and set values
- Create the new view for the widget instance
- Update the widget packaging configuration
- Build and deploy the widget
PREREQUISITES
- Visual Studio Code
- Node.js
- Akumina toolchain downloaded and configured
- Completion of the previous exercise
Create a new widget from a stub
You will start the process of creating your own widget by creating a stub utilizing the toolchain. To create a new widget, perform the following steps:
- In the Terminal window, type npm run stub.
- When prompted for the widget name, type GenericListWidget.
- When prompted for the widget namespace, type ‘Akumina.AddIn’.
- When prompted for the type of stub to generate, simply select the default Hello World.
- When prompted for the folder place generate files, select the default (src/js/widgets).
- When asked if you would like this to be a TypeScript stub, enter “y” (for “Yes”).
- When asked if this stub should only be used to generate instances, select “Y” (for “Yes”).
Verify that the widget was created
Once the generation script has completed, you can verify that your widget now exists. To verify that the widget was created, perform the following steps:
- In Visual Studio Code, use the Explorer and expand the src, js and widgets folders. There you should see a GenericListWidget folder.
- Expand the GenericListWidget folder. Inside, you will see three folders – config, js and views.
Simplifying the Widget Configuration
- Delete the ‘js’ folder.
- Open the config folder and edit the config.json file
- Rename the “Class” to “Akumina.AddIn.GenericListControlWidget.
- Find the “Properties” node within the “Definition” node.
- Remove the placeholder value.
- Find the “Views” node.
- Rename the “Name” to “List”.
- Rename the default view to “List.html”
- Find the “JS” node.
- Remove the value.
- Find the “Properties” node within the “Instances” node.
- Replace the placeholder property with the shown values. `
- Find the “SelectedView” node within the “Instances” node.
- Replace the value with “List”.
- Your config.json file should now look like this:
{
    "Definition": {
        "Name": "GenericListWidget",
        "Class": "Akumina.AddIn.GenericListControlWidget",
        "ContentTypes": [],
        "Version": "",
        "Dependencies": [],
        "Properties": [],
        "Views": [
            {
                "Name": "List",
                "Path": "/Style%20Library/DigitalWorkPlace/Content/Templates/GenericListWidget/List.html",
                "Id": "15dde27a-6369-f452-3e01-0f7f1190d8df"
            }
        ],
        "JS": {
            "Default": ""
        }
    },
    "Instances": [
        {
            "Name": "GenericListWidget stub instance",
            "Description": "GenericListWidget instance description",
            "Icon": "fa fa-cog",
            "Id": "5321db85-0685-fc3b-4028-7131eafb11df",
            "Properties": [
                {
                    "name": "selectfields",
                    "value": "Title,Value"
                }, {
                    "name": "listname",
                    "value": "DigispaceConfigurationIDS_AK"
                }
            ],
            "SelectedView": "List",
            "AvailableViews": [],
            "HiddenFields": []
        }
    ],
    "Options": {
        "IsPartialDefinition": true,
        "IsDashboardWidget": false
    }
}
Creating a New View
- Find the “default.html” file in the “views” folder.
- Note the generic contents.
- Replace the html with a handlebars-powered list.
- Rename the file “List.html”
- Package the Widget
- Packaging your widget will convert it into a web-packed form and zip it for distribution.
- Run ‘npm run package’ to package your widget.
Update deployment options
The akumina.sitedeployer.config.json file contains a series of options that define which artifacts should be deployed at a given time. To configure the Site Deployer toolchain to deploy your custom list, perform the following steps:
- In Visual Studio Code, open the akumina.sitedeployer.config.json file.
- In the file, find the Options section.
- Each line represents a type of artifact that can be deployed using the Site Deployer toolchain. For any line set to ‘true’, the tool will look for the appropriate files and attempt to deploy them to the SharePoint site.
- Set ‘widgets’ to ‘true’.
Save all files. From the File menu in Visual Studio Code, select the Save All menu item.
Run the Site Deployer toolchain
Once the files are properly configured, the Site Deployer toolchain can be used to deploy the artifact (the new SharePoint list) to the SharePoint site. To run the Site Deployer toolchain, perform the following steps:
- Open a Terminal window in Visual Studio Code.
- From the Visual Studio Code menu, select View -> Terminal.
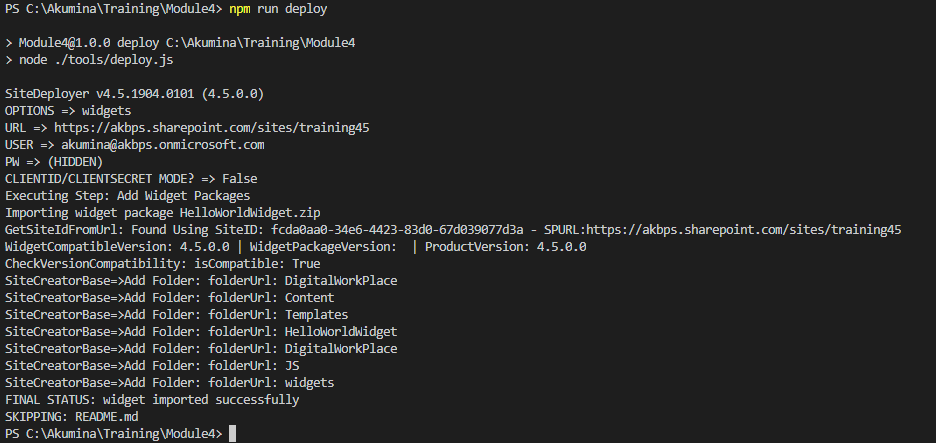
- From the terminal prompt, run the Site Deployer toolchain.
- Enter ‘npm run deploy’.
Check for issues.
Your output should look like this:
Validate the deployment
Once the deploy script has successfully executed, you can validate that your widget has been successfully deployed. To validate deployment, perform the following steps:
- Open a web browser.
- Enter the URL of your SharePoint site. Provide your credentials if required.
- In the center of the page, click on the Akumina icon.
- From the icon selections, click on the first icon to open the App Manager.
- From the App Manager page, select the Management Apps menu item.
- From the Management Apps page, select the Widget Manager icon.
- From the Widget Manager page, locate your widget.
- Click on the “instances” button to view your new instance.