CK Editor external plugins
Applies to
Akumina Framework Version 6.0.2301.1506 or higher
Overview
The purpose of this article is to explain how to customize your CK Editor with external plugins.
Customizing your CK Editor
Note: Akumina supports 2 versions of CK Editor: 4 and 5 This documentation differs for both the versions, so please follow the steps for the version you are planning to use.
CK Editor 4:
- To add custom plugins to the CKEditor, you need two things:
- Update the ak-ckeditor4-config.json file available at templateUrlPrefix/content/editor/ck4
- Copy and Paste your custom external plugins at templateUrlPrefix/content/editor/ck4/plugins Note: If the plugins folder is not available, please create one under: templateUrlPrefix/content/editor/ck4
- The format to update the ak-ckeditor4-config.json is as below:
    {
    "externalPlugins": [
        {
            "name": "plugin1",
            "path": "/plugin1/plugin.js"
        },
                {
            "name": "plugin2",
            "path": "/plugin2/plugin.js"
        }
    ]
    }
Nodes in the above JSON:
externalPlugins: This is an array of objects. Each object here should have two properties:
    name: //Name of your custom plugin. You can get this from the plugin.js file
    path: //Relative path to the plugin.js file. So, if your custom plugin.js is in a folder called plugin1, the path will be "/plugin1/plugin.js"

        Note: Your path to the plugin file should always start with a forward slash ("/")
- You can choose to change the position of your plugin by going to the plugin.js and find and update the below line:
- Look for: editor.ui.addButton
- Update the toolbar property with a tool bar group and an index of where to put your plugin in that group:
editor.ui.addButton && editor.ui.addButton( 'plugin1', {
                label: editor.lang.templates.button,
                command: 'plugin1',
                toolbar: 'akexternal,10'
            } );
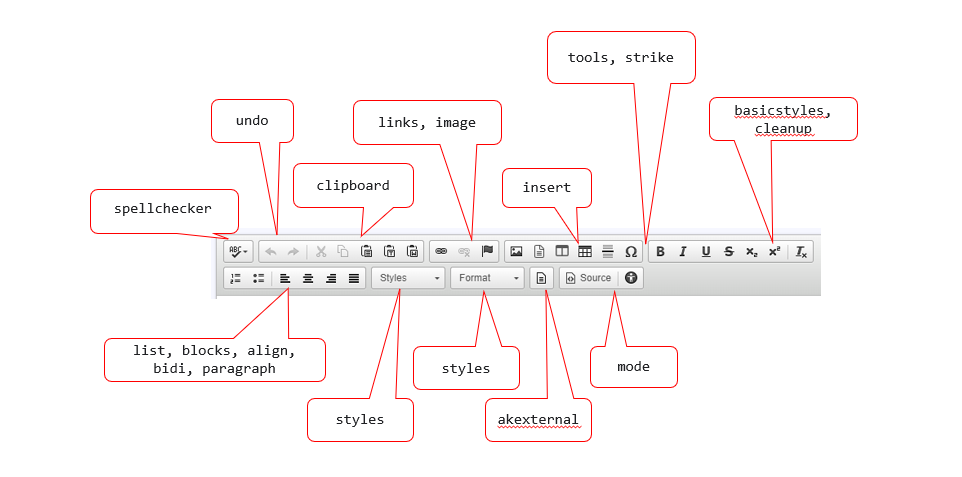
The following are the tool bar group options you have to place your plugin at:
Once your JSON is ready, use a json parser online (like codebeautify) or your browser console to validate its a valid json. If not, fix the json before saving it to the templateUrlPrefix/content/editor/ck4 path
How to write your custom plugin: Refer documentation here to build a custom CK Editor 4 custom plugin
CK Editor 5:
To add custom plugins to the CKEditor, you need two things:
- Update the ak-ckeditor5-config.json file available at templateUrlPrefix/content/editor/ck5
- Copy and Paste your custom external plugins at templateUrlPrefix/content/editor/ck5/plugins Note: If the plugins folder is not available, please create one under: templateUrlPrefix/content/editor/ck5
The format to update the ak-ckeditor5-config.json is as below:
    {
    "externalPlugins": [
        {
            "name": "plugin1",
            "path": "/plugin1/yourplugin1.js"
        },
                {
            "name": "plugin2",
            "path": "/plugin2/yourplugin2.js"
        }
    ]
    }
Nodes in the above JSON:
externalPlugins: This is an array of objects. Each object here should have two properties:
  name: //Class of your custom plugin
  path: //Relative path to the js file of your custom plugin. So, if yourplugin1.js file is in a folder called plugin1, the path will be "/plugin1/yourplugin1.js"

       Note: Your path to the plugin file should always start with a forward slash ("/")
Once your JSON is ready, use a json parser online (like codebeautify) or your browser console to validate its a valid json. If not, fix the json before saving it to the templateUrlPrefix/content/editor/ck5 path
How to write your custom plugin:
a. Refer the documentation from here to implement custom CK Editor 5 plugins
b. Once your custom plugin is ready, update the following places to use Akumina classes instead of CK Editor classes:- Plugin => Akumina.CkEditor.Plugin
- ButtonView => Akumina.CkEditor.ButtonView
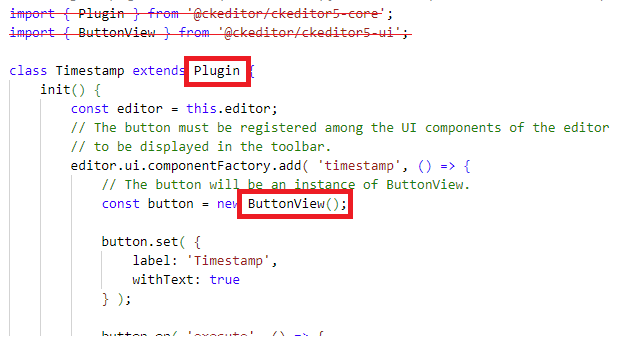
So, instead of:
your custom plugin should look like:
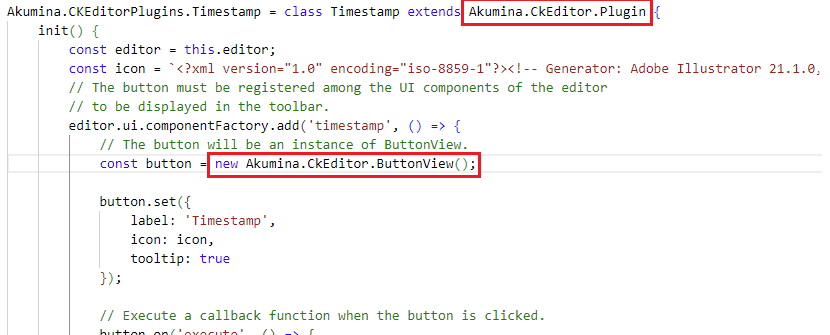
c. If you want to use an icon for your toolbar button, you need to specify an svg as a string as shown in the sample below (const icon = "..."). SVG is the only supported format for an icon in CKEditor 5 as of now. You need to take your SVG's content and paste it as a string as shown below:
Akumina.CKEditorPlugins.Timestamp = class Timestamp extends Akumina.CkEditor.Plugin {
init() {
    const editor = this.editor;
    const icon = `<?xml version="1.0" encoding="iso-8859-1"?><!-- Generator: Adobe Illustrator 21.1.0, SVG Export Plug-In . SVG Version: 6.00 Build 0)  --><svg xmlns="http://www.w3.org/2000/svg" xmlns:xlink="http://www.w3.org/1999/xlink" viewBox="0 0 50 50" width="20px" height="20px"><circle style="fill:none;stroke:#000000;stroke-width:2;stroke-linecap:round;stroke-miterlimit:10;" cx="25" cy="25" r="22"/><circle cx="25" cy="25" r="3"/><polyline style="fill:none;stroke:#000000;stroke-width:2;stroke-linecap:round;stroke-miterlimit:10;" points="17,33 25,25 25,8 "/></svg>`
    // The button must be registered among the UI components of the editor
    // to be displayed in the toolbar.
    editor.ui.componentFactory.add('timestamp', () => {
        // The button will be an instance of ButtonView.
        const button = new Akumina.CkEditor.ButtonView();

        button.set({
            label: 'Timestamp',
            icon: icon,
            tooltip: true
        });

        // Execute a callback function when the button is clicked.
        button.on('execute', () => {
            const now = new Date();

            // Change the model using the model writer.
            editor.model.change(writer => {

                // Insert the text at the user's current position.
                editor.model.insertContent(writer.createText(now.toString()));
            });
        });

        return button;
    });
  }
}
d. Put your class inside Akumina.CKEditorPlugins as shown in above sample so that it looks as below (Make sure the names are the same for your plugin class and the Akumina.CKEditorPlugins object):
Akumina.CKEditorPlugins.YourClassName = class YourClassName extends Akumina.CkEditor.Plugin {
...
}
e. Note that you will not need any imports from the CKEditor solution
f. Positioning the toolbar item for your plugins is not possible in CK Editor 5 as of now. All custom plugins will appear at the end of the toolbar in the order you have specified in the config json.