Overview
Site Deployer
This is a console app used for deploying Akumina bits into Sharepoint online. It can be used for local developer workstations or within VSTS / automated CI tooling. The same site package used within Site Creator can be used with the Site deployer, or vice versa.
Download
Please see the release section for downloading the Site Deployer assets
Appendix
- Overview
- Site Deployer Auth Flows
- Developer Flow (local machine)
- Azure Dev Ops (CI/CD)
- Runtime
- Prerequisites
- Configuring a new Site Deployer AAD Client App
- Configuring App Manager AAD Client App Permissions
- Build, Package and Deploy for local DEVELOPER environment
- SitePackage Configuring .env file
- Configuring - akumina.sitedeployer.config.json file
- Deploy for Azure Dev Ops (CICD) environment
Overview
Use this document as a reference for configuring, developing, and deploying Akumina SharePoint Site Artifacts and Configurations. It will guide you through the process of setting up a new Azure AD (AAD) app (if this is your first time) or updating an existing AAD app for Site Deployer. Additionally, you'll learn how to leverage the Application ID URI as a custom scope for the CI/CD flow.
Runtime
- Stack: Node (Version 10.x or later), NPM (6.x or later) and .NET Framework 4.8; As of this writing the latest version used to compose this document was node version 16.16.0 and npm version 8.14.0
- OS: Windows
Prerequisites
The following are the prerequisites
- Fully configured Latest 6.2 AppManager (6.2.2405.1301+)
- Fully deployed Site Environment using Standard or Central/Delivery
- Install Yeoman - Refer to Yo Akumina
- Yo brings latest windows platform based Akumina SiteDeployer.exe
- App Manager Tenant config file must have Client Assertion certificate configured
Configuring a new AAD Client App for SharePoint Token
To make a secure user-based connection between Site Deployer and AAD Client App, make sure that the AAD Client App has the following configuration:
Follow the steps below to create a new Azure AD (AAD) app:
- Goto Azure Active Directory --> App Registration--> New Registration
- Choose Accounts in this organizational directory only (Single tenant)
- Create App
- Edit App
- Goto Manager --> Authentication --> Add a platform
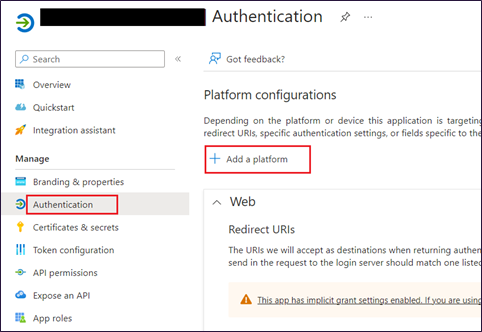
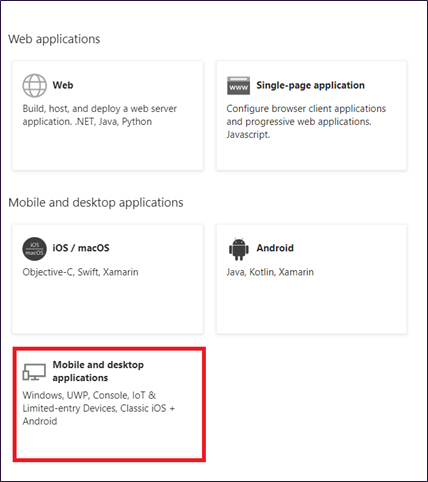
- Choose Mobile and desktop applications
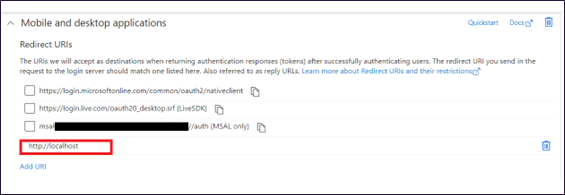
- Add Uri - http://localhost (dont add http(s))
- Under Allow public client flows - choose Yes
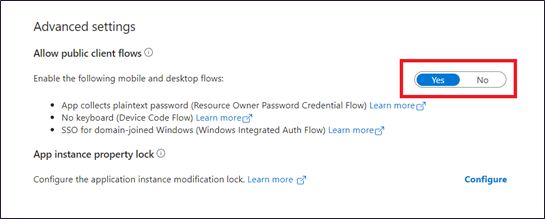
- Save
Configure App Permissions to be able to deploy to Sharepoint properly
- Goto Azure Active Directory --> App Registration--> Pick App created above
- Click API Permissions
Refer to the below table and update the App Manger ADD Client Permissions If required.
Delegated Permissions required for use by local DEVELOPER environment
| # | Site Deployer Options | Permissions Needed | Permission Scope/Type |
|---|---|---|---|
| 1 | addtermsets | TermStore.ReadWrite.All | Delegated |
| 2 | lists, groups, siteproperties, sitepermissions, modernprovisionapp, masterpage, layouts, webpartgallery | AllSites.FullControl | Delegated |
| 3 | js, css, pages, controls, widgets, contentfiles, imagefiles, fonts, updatelists, homepage, exportlists, uploadfiles, virtualpages, spusersearch, virtuallayout, exportcomments, updatespaproperties, streamcards, virtualtomodern | AllSites.Manage | Delegated |
| 4 | cdnassets | user_impersonation | Delegated |
Application ID URI and App Role required for CICD flow
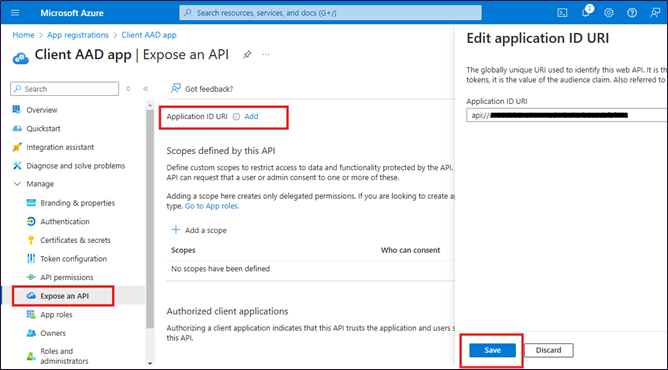
Configure Application ID URI
Goto Azure Active Directory --> App Registration--> Pick App created above
Click Expose an API --> Add
Save
Save this Application ID URI in App Manager > Settings > Tenant Config > Advanced Settings > CICD Application ID URl. (optional but recommeded for enhanced security, App Manager uses this setting to validate the CICD request)
Configure App Role
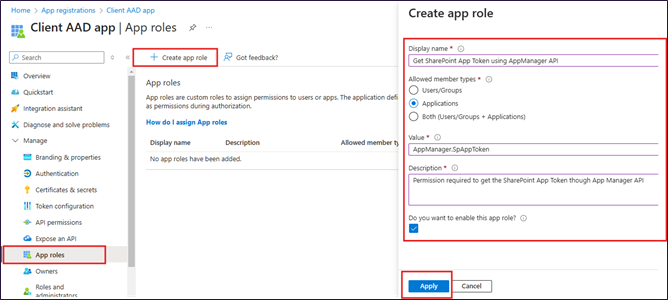
App Roles --> Create App Role
Fill in below details in Create App Role section (you must not change the values in bold)
Disaply Name: You can enter according to your preference.
Allowed member types: Applications
Value: AppManager.SpAppToken
Description: You can enter according to your preference.
Do you want to enable this role?: Yes
Apply
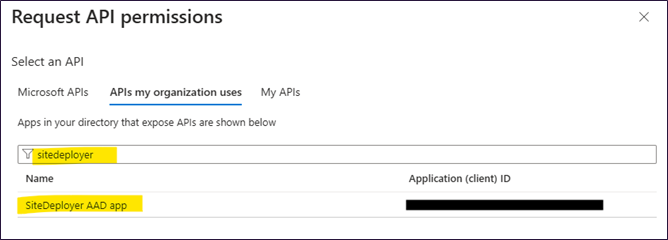
Click API Permissions --> Add a permission --> APIs my organisation uses
Search for AAD app name that you created above and click on it
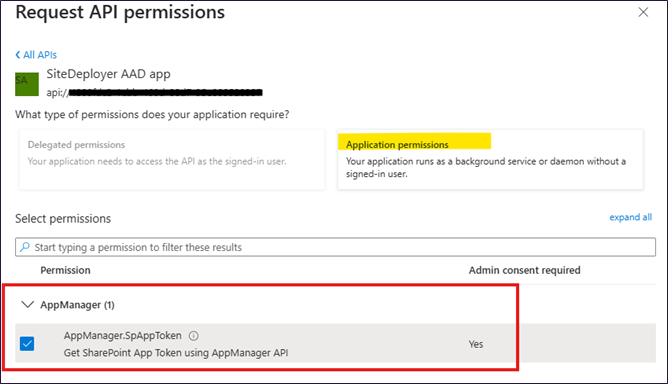
- Select Application permission and check AppManager.SpAppToken
- Click App permission and Grant admin content to complete the permission configuration
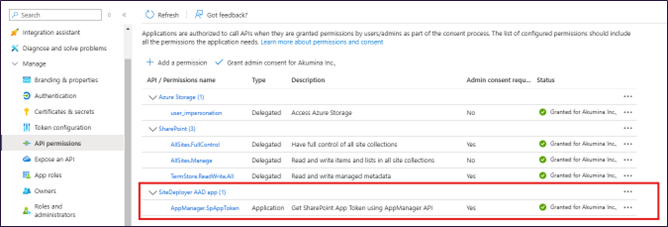
Configuring App Manager AAD Client App Permissions
- Goto Azure Active Directory --> App Registration --> Open App Manager AAD Client App
- Goto Manage --> API Permissions --> Refer to the below table and add/update the Permissions.
Application Permissions required for CICD flow (uses Application instead of Delegated)
| # | Site Deployer Options | Permissions Needed | Permission Scope/Type | API |
|---|---|---|---|---|
| 1 | addtermsets | TermStore.ReadWrite.All | Application | SharePoint |
| 2 | lists, groups, siteproperties, sitepermissions, modernprovisionapp, masterpage, layouts, webpartgallery | Sites.Selected 1 | Application | SharePoint |
| 3 | js, css, pages, controls, widgets, contentfiles, imagefiles, fonts, updatelists, homepage, exportlists, uploadfiles, virtualpages, spusersearch, virtuallayout, exportcomments, updatespaproperties, streamcards, virtualtomodern | Sites.Selected 1 | Application | SharePoint |
1 Full Control permission must be granted to the Central and any Delivery sites needed
Build, Package and Deploy for local DEVELOPER environment
For local development, there is no configuration for passwords/secrets etc. The npm run deploy command will PROMPT for your credentials. For automated deployments via devops, see CICD
configuring .env file
Open the file .env in your Site Package and update values for the following fields. See more detailed options
| Config Key | Config Value |
|---|---|
| spurl | Delivery site Url |
| centralspurl | Central site Url |
| tenantid | Current Tenant Id - https://www.whatismytenantid.com {tenant.onmicrosoft.com} |
| aadclientid | AAD storage client application Id. Navigate to an AAD App (you have created as a pre-requisite for this document) > overview > copy Application (client) ID |
| appmanagerurl | AppManager Url |
Make sure the following lines are added
tenantid=
aadclientid=
appmanagerurl=
configuring - akumina.sitedployer.config.json file
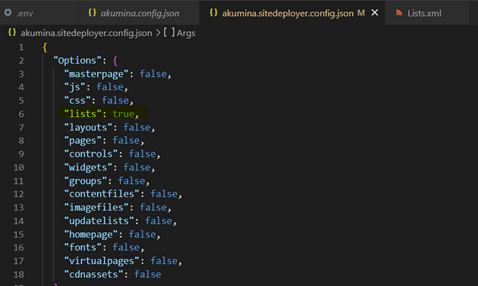
Edit akumina.sitedeployer.config.json file and set whatever options you want to run to true as shown in below screenshot in this example since we are deploying the list, we have set the options lists to true. See more detailed options
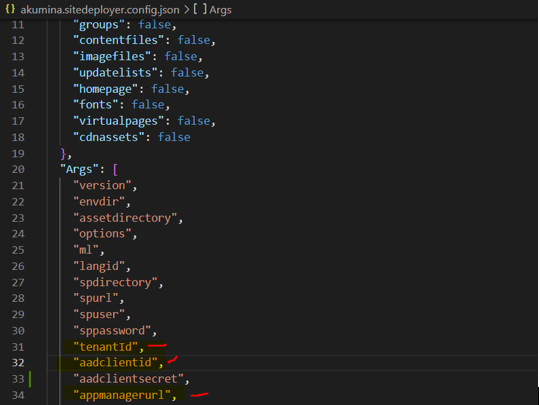
Make sure following arguments are there in the Args array as shown in below screenshot:
"tenantid",
"aadclientid",
"appmanagerurl"
Run the following commands in order to deploy the configurations/artifacts to SharePoint
npm run deploy
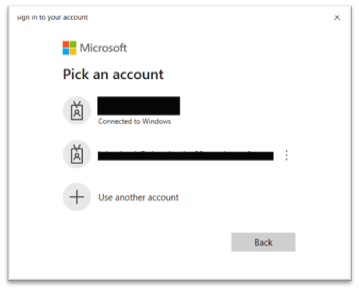
You will get the prompt to authenticate yourself.
Deploy for Azure Dev Ops (CICD) environment
For CI/CD, since authentication via prompt isn't possible, we've added the aadclientsecret and addcustomscope options that can be used in the Azure DevOps pipeline/release process. The aadclientsecret should be set as a hidden/private variable and should not be accessible to developers. The addcustomscope should be the Application ID URI that was created above. Technically you could use this option for local development but it is not recommended.
The following arguments will be used within your pipeline
envdir,assetdirectory,spurl,tenantId,aadclientid,aadclientsecret,appmanagerurl,addcustomscope
Setup a Pipeline using aadclientid and aadclientsecret
- Navigate to Pipeline and then click New pipeline
- Select Code as Azure Repos Git
- Select your repository
- Select Configure Pipeline as Node.js or starter pipeline
- In the YAML window copy paste the following content
trigger:
- main

pool:
  vmImage: windows-2022

steps:
- task: CmdLine@1
  displayName: 'Create list and list-items'
  inputs:
    filename: '$(Build.SourcesDirectory)\tools\Akumina.SiteDeployer.exe'
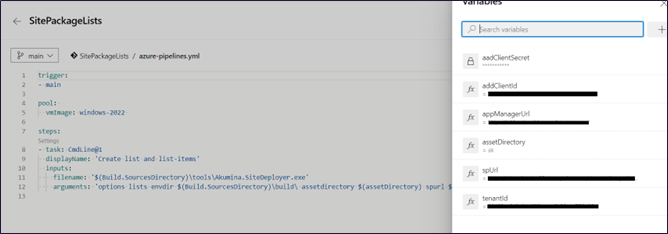
    arguments: 'options lists envdir $(Build.SourcesDirectory)\build\ assetdirectory $(assetDirectory) spurl $(spUrl) tenantId $(tenantId) aadclientid $(addClientId) aadclientsecret $(aadClientSecret) appmanagerurl $(appManagerUrl) aadcustomscope $(addCustomScope)'
- From the right corner, Click Variable and then add all variables from the variable listed in the beginning of the session, refer the following screen for completed view
Troubleshooting
- The following error message will be shown in the prompt if you dont have proper permissions added
AADSTS650057: Invalid resource. The client has requested access to a resource which is not listed in the requested permissions in the client's application registration. Client app ID: 14f2ce3d-f62a-4eec-b2c9-11111111(60-sitedeployer-developerexperience). Resource value from request: https://tenant.sharepoint.com. Resource app ID: 00000003-0000-0ff1-ce00-000000000000. List of valid resources from app registration: 00000003-0000-0000-c000-000000000000.
Helpful links
Site Package overview:
https://github.com/akumina/AkuminaTraining/wiki/Site-Package-Overview
Continuous Intergration flow:
https://github.com/akumina/AkuminaTraining/wiki/Site-Deployer:-Continuous-Site-Package-Deployment-via-a-console-app
Older Versions / Links / Info
Version 4.8 https://akumina.github.io/docs/Site-Deployer-Version-4-8
Version 5.0/5.5 https://akumina.github.io/docs/Site-Deployer-Version-5-0
Using site deployer with MFA https://akumina.github.io/docs/Site-Deployer-AppOnly
